Saturday, February 20, 2010

WPF- Model-View-ViewModel

When it comes to WPF development, WPF provides us with its wide range of features to use. WPF is rich in features and give us more power to develop highly detailed and quailty UI 's. It give us more power and control over our development. On the other hand I came to WPF development from Windows Forms and it did really helps to start fresh with WFP and leave the Win Form concepts for Win Forms. But as I got deeper in WPF , I realized the power it has to offer. The features like Data Templating, Control Templating, Command Binding, Routed Events, Styles , Resources etc give us the exact power to create a line of bussiness
application with rich UI's.


One thing that brings all the features of WPF to there full powress is building the WPF apps with the use of Model-View-ViewModel pattern This pattern combines all the features of WPF and utilizes them to create the application that has clear seperation between the UI and Logic . Application is loosly coupled and testable when developed using the MVVM pattern.


MVVM seperates the application design in three parts, Model, ViewModel, Views. Model act as the datarepositry and has the database connectivity or database mapped classes. It can be anything Linq-2-Sql, Entity Framework or any other ORM classes. Model are there and are not aware of anything (View Model or Views).


Next are the ViewModel classes that holds the logic for the actions that are done on Views . ViewModel classes are used to set up as the DataContext of the Views. In WPF , setting up datacontext of a control means that child element's also has its datacontext set as that of parent, if not exclusivly defined otherwise. By setting up the ViewModel as datacontext for a View we can set several datasources for various elements in Views .

void MainView_Loaded(object sender, RoutedEventArgs e)
{
_mainVM = new MainWinViewModel();
_mainVM.OnCloseEvent += new Action(_mainVM_OnCloseEvent);
this.DataContext = _mainVM;
}


View Model also simply encapsulate the Model classes. But its the CommandBinding feature of WPF that is utilized to communicate from Views to the ViewModel. As of the pattern, Views actually contains no code but only the xaml. That means we have to setup command binding in xaml for any user action to be delivered to the ViewModel to act upon. For this we define Commands in ViewModel and after setting it as the datacontext of the view , we bind the commands to various elements in View. These commands are known as Delegated Command or Relayed Command.


public class CustomersViewModel : ViewModelBase,
IDataErrorInfo
{
private Customer_Mst _custMst = null;
public string CustomerName
{
get
{
return _custMst.CustomerName;
}
set
{
_custMst.CustomerName =
value;OnPropertyChanged("CustomerName");
}
}


public class CustomersMgrViewModel :ViewModelBase
{
private ICommand _saveCommand = null;
private ICommand _deleteCommand = null;
private ICommand _updateCommand = null;
private ICommand _searchCommand = null;
private CustomersViewModel _customer =null;
public event Action OnReloadDataSource;

public ICommand SaveCommand
{
get
{
if(_saveCommand == null)
{
_saveCommand = new
DelegatedCommand(p => Save(), p => CanSave());
}
return _saveCommand;
}
}
private void Save()
{
try
{
using(CustomersDataContext context
= new CustomersDataContext())
{
Customer_Mst custMst = new Customer_Mst();
custMst.CustomerId = Customer.CusomerId;
custMst.CustomerName = Customer.CustomerName;
custMst.OrderId = Customer.OrderId;
context.Customer_Msts.InsertOnSubmit(custMst);
context.SubmitChanges();

if(this.OnReloadDataSource != null)
{
this.OnReloadDataSource();
}
ClearAll();
}
}
catch (Exception ex)
{
System.Windows.MessageBox.Show(ex.Message,"Error");
}
}


Delegated/Relayed Command simply take delegate for Execute and CanExecute methods . ViewModel handles the action for these commands and perform any logic using Model classes .

public class DelegatedCommand : ICommand
{
readonly Action<-object> _execute;
readonly Predicate<-object> _canexecute;

public DelegatedCommand(Action<-object> execute)
: this(execute, null)
{
}
public DelegatedCommand(Action<-object> execute,
Predicate<-object> canexecute)
{
if (execute == null)
{
throw new ArgumentNullException("ExecuteNull");
}
this._execute = execute;
this._canexecute = canexecute;
}
public bool CanExecute(-object parameter)
{
return _canexecute == null ? true :
_canexecute(parameter);
}
public event EventHandler CanExecuteChanged
{
add
{
CommandManager.RequerySuggested += value;
}
remove
{
CommandManager.RequerySuggested -= value;
}
}
public void Execute(-object parameter)
{
_execute(parameter);
}
}
}


View 's are simply the xaml file whose data context is set up as the relative ViewModel class. ViewModel provide the datasources for various elements in the View . View leverages the powerful features like styling , data templating, Resources, Control Templating etc to create unique UI's for the data from ViewModel data sources. Commands for the View Model act as the bridge between the View and the ViewModel.

There is no hard dependency between View and ViewMoldel, so ui designer can work independently and developer can code the logic. As previously said there is no code in Views and all the interaction code are handled by the ViewModel.


<-listbox name="lstCustomers" itemssource="{Binding}" issynchronizedwithcurrentitem="True">

<-stackpanel orientation="Horizontal" row="3" horizontalalignment="Right">
<-button name="btnSave" content="Save" width="70" command="{Binding Path= SaveCommand}">
<-button name="btnDelete" content="Delete" width="70" command="{Binding Path= DeleteCommand}">
<-button name="btnUpdate" content="Update" width="70" command="{Binding Path= UpdateCommand}">
<-button name="btnSearch" content="Search" width="70" command="{Binding Path= SearchCommand}">


Other resources. Book on MVVM by Josh Smith

Wednesday, February 10, 2010

Visual Studio Extensibility.

This blog is about some of the things that I searched for, while on a Visual Studio Extensibility project . Extensibility documentations are notoriously difficult to go through and you spend a lot of time finding the stuff that you do really care about. One by one I will go through the things that I found useful.

One of the thing that is usually done on a extensibility project for Visual Studio is to bind to the events that are fired by Visual Studio, like on solution opened , removed, debug begin , done, project opened, closed, projectitem added, removed.

To bind to all these events we have to get the handle to the extensibility object DTE/DTE2 . In my previous post Visual Studio CommandBars , I have explained how to get this handle. Now DTE exposes Events class that in turn have all the events that we can get. Lets look at how to do this.

Events vairable to hold on to the build events of the project opened in Visual Studio.
private BuildEvents _buildEvents;

Events vairable to hold on to the Soultion events of the solution opened in Visual Studio.
private SolutionEvents _solutionEvents;

Events vairable to hold on to the project events of the project opened in Visual Studio.

//For CS project
private ProjectItemsEvents _projectItemEventsCs;

//For VB project
private ProjectItemsEvents _projectItemEventsVb;

Events vairable to hold on to the DTE events of the dte object.
private DTEEvents _dteEvents;

Getting the events is simple:-

//Getting the build event of the project.
_buildEvents = _dte.Events.BuildEvents;

//Binding the build events.
//On build Begin
_buildEvents.OnBuildBegin += buildEvents_OnBuildBegin;

//On build Done.
_buildEvents.OnBuildDone += buildEvents_OnBuildDone;

//Getting the solution events
_solutionEvents = _dte.Events.SolutionEvents;

//Binding the solution events.
//Project added to the solution
_solutionEvents.ProjectAdded += solutionEvents_ProjectAdded;

//Solution opened in the VS.
_solutionEvents.Opened += solutionEvents_Opened;

//Getting the DTE events.
_dteEvents = _dte.Events.DTEEvents;

//On bigining the shutdown of solution
_dteEvents.OnBeginShutdown += DteEvents_OnBeginShutdown;

//Project Items Events
// Getting the events for the CS project
_projectItemEventsCs = _dte.Events.GetObject("VBProjectItemsEvents") as ProjectItemsEvents;

// Getting the events for the VB project
_projectItemEventsVb = _dte.Events.GetObject("CSharpProjectItemsEvents") as ProjectItemsEvents;

//On project item removed from the project. (So are the event for ItemAdded, but no event for the change in the project item)
_projectItemEventsCs.ItemRemoved += new _dispProjectItemsEvents_ItemRemovedEventHandler(_projectItemEventsCs_ItemRemoved);
_projectItemEventsVb.ItemRemoved += new _dispProjectItemsEvents_ItemRemovedEventHandler(_projectItemEventsCs_ItemRemoved);

These were the ways to bind to the Visual Studio Solution and Project events. Now lets look at something to access and set the properties of the solution and projects .

To access the assembly name of the project:-
string assemblyName = _dte.Solution.Projects.Item(1).Properties.Item("AssemblyName").Value.ToString();

To set the assembly name:-
_dte.Solution.Projects.Item(1).Properties.Item("AssemblyName").Value = assemblyName;

To get the output path of the Project:-
string OutputPath = _dte.Solution.Projects.Item(1).ConfigurationManager.ActiveConfiguration.Properties.Item("OutputPath").Value.ToString();


To build the solution :-
_dte.Solution.SolutionBuild.Build(true);

To do a Debug build and Release Build for the project in Solution.
_dte.Solution.SolutionBuild.BuildProject("Debug", _dte.Solution.Projects.Item(1).FullName, true);
_dte.Solution.SolutionBuild.BuildProject("Release", _dte.Solution.Projects.Item(1).FullName, true);

To animate the Visual Studio Status Bar:-

_dte.StatusBar.Animate(true, vsStatusAnimation.vsStatusAnimationSave);
//To set value for the progress
_dte.StatusBar.Progress(false, "Done", 100, 100);
//To stop animation.
_dte.StatusBar.Animate(false, vsStatusAnimation.vsStatusAnimationSave);

To check the type of the Project :-

if (_dte.Solution.Projects.Item(1).Kind == PrjKind.prjKindVBProject)
{
projectType = ".vbproj";
}
else
{
projectType = ".csproj";
}

To load controls assembly into the ToolBox:-

Window toolBoxWindow = _dte.Windows.Item(Constants.vsWindowKindToolbox);
toolBoxWindow.Visible = true;
ToolBoxTabs tabs = ((ToolBox)toolBoxWindow.Object).ToolBoxTabs;
ToolBoxTab waspTab = tabs.Add("My tools");
_dte.ExecuteCommand("View.PropertiesWindow", "");
waspTab.Activate();
waspTab.ToolBoxItems.Item(1).Select();
waspTab.ToolBoxItems.Add("Controls", ControlsFilePath, vsToolBoxItemFormat.vsToolBoxItemFormatDotNETComponent);

Hope all the beings will find it useful while dealing with the VS extensibility.

Monday, February 8, 2010

Unity Application Block (Dependency Injection)

Writing a stable and efficient software has been always a challenge for developers. In a team environment , working on a application and collaborating with other team member poses its own set of challenges. To tackle all these issues we as a developer adopt wide range of standard and industry approved design patterns . The focus is on designing the application that has modularity and is loosely coupled . Various components of the application have to be designed, so that they do not have dependencies on each other and should wire up efficiently with each other. These components should be able to fit with the other application where they are required, enhancing the code reusability .

Various types of design techniques are used for various types of projects like Model View Controller for web projects, Presenter Model and Model View ViewModel for WPF projects etc . Patterns are in place for providing dependency free and loosely coupled applications like Unity Framework , Object Builder , Ninject, Spring Net etc.

Dependency Injection resolves wide range of issues while implementing a effective design for components building. With DI our classes do not refer any dependent class directly , but via interface that hides the concrete type from our class. For example if the Class A have direct reference of the Class B , then our Class A is dependent on Class B. Now Class B concrete type dependency have to be available at the compile time .

Any changes in Classs B will result in the changes in classes that have direct reference of the Class B. Testing of the Class A now is impossible in isolation mode bcoz of dependency on the Class B. There is now repetitive code to create , locate and manage the dependency for every classes that directly reference the Class B.

Implementing DI in the given scenario will mean to have an Interface for the Class B . Now Class A refers to the interface instead of the concrete type Class B. Concrete type of the dependency is now hidden from our class and at compile time there is now no concrete dependency in the Class A. Testing in isolation is now possible as we can create mock types that implement the interface and provide there instances to our Class A. Initialize, locate and manage logic of the dependencies can now be provided from centralized location. In DI we inject the dependent objects in the class , in comparison to allowing the class to create the objects of the dependent class themself.

Now the code that uses the Class A have to configure the Class A , that means resolving the dependencies and injecting them in Class A. But all the client code that uses the Class A will have to perform configuration resulting in some repetitive code . We can leverage the .Net reflection to resolve our dependencies dynamically , that can be done by the use of Containers . Containers provide the way to resolve the dependencies dynamically and configure the classes in comparison to being configured by the client code .

Unity Application Block provide us with tools and framework to implement DI within our applications. In this blog we will look into the Unity Application Block and simple example how to configure a sample application to implement DI using Unity Application Block.

Unity Application Block is the part of Microsoft Enterprise Library .For our sample we will be creating a simple console application and adding the reference of the assemblies Microsoft.Practices.Unity, Microsoft.Practices.Unity.Configurationn and Microsoft.Practices.ObjectBuilder2. These assemblies are available to you once you have installed Microsoft Enterprise Library (4.1 is latest version at the time of writing this blog.). Once we have a console application and referenced assemblies we are ready to build the Unity implemented application . Sample application has a component that uses a service, this component is consumed by the parent component. A simple working of the DI using Unity is implemented in this sample.

Dependency Injection are of three type:- Method Dependency Injection, Property Dependency Injection and Constructor Dependency Injection. In this sample all the type of dependency injection method are used.

We start by creating the interfaces to implement our sample architecture. We create two interface IMarketService for the service and IComponent for the sub-component.


Then we create concrete types that implement these interfaces -ServiceA and ComponentA . ServiceA implements the constructor injection and ComponentA implements property injection. Implementing the injection on the property, method and constructor is simple, we simply define the attribute on the respective dependency injection points.

  • [Dependency] Attribute for the Property Injection.
  • [InjectionConstructor] Attribute for Constructor injection.
  • [InjectionMethod] Attribute for the Method Injection.


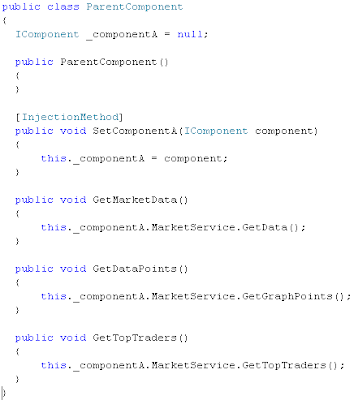
Next there is class for the consumption of the Component :- ParentComponent.


This class implement the method injection. Now we have three concrete classes ;- ServiceA, ComponentA and ParentComponent. ParentComponent consumes the ComponentA, ComponentA uses the ServiceA , but all of them are not tightly coupled and there dependencies are resolved at run time.

Now the code to cofigure the whole setup and make it work.


We use UnityContainer class to configure whole setup.IUnityContainer works for us as a container that dynamically resolves the dependencies and handles the initialization logic for whole setup. We use the RegisterType method of the Unity Container to register type for injection mechanism and mapping with the container.

Next we use the UnityContainer's Configure method to provide the constructor parameter value for the ServiceA injected type. Finally we use the Resolve method of the UnityContainer to resolve all the dependencies and to inject them for parent container . This method returns the instance of the parent container and creates the instances of the dependency types and injects them.

Throughout the whole process we never used 'new' to create dependency instance for injection. UnityContainer took care of all that and also injected them at proper places (where the attributes were defined.)

Wednesday, February 3, 2010

Add-In Pipeline Development Part-2

In my previous blog we looked into the architecture of the Add-In Pipeline , now its time to see practical implementation . To build a Add-In project we need following components of pipeline:-


  • Host
  • Host Views
  • Host Side Adapter
  • Contract
  • Add-in Side Adapter
  • Add-In Views
  • Add-In

We create a project for each of the above components. We also need a directory structure to implement our pipeline and for discovery of our Add-ins. Lets start with creation of directory structure, we create following folders to hold our pipeline assemblies.

  • [AddIns] :- folder to hold our add-in assemblies.Inside the folder all the add-in assemblies will be kept inside the subfolder having same name as add-in assembly.
  • [AddInSideAdapters] :- folder to hold the add-in side adapters assembly.
  • [AddInViews] :- folder to hold the add-in views assembly.
  • [Contracts] :- folder to hold the contracts assembly.
  • [HostSideAdapters] : - folder to hold host side adapter assembly.


Host and the host view assembly resides along with above folders without any subfolder.We start with creating a Contract Interface assembly :-

  • Add a new class library project to a new solution in visual studio.
  • Add reference of the assembly System.AddIn.Contract.
  • Add an interface code file from Add new project dialog box.Name the Interface.
  • Add using statement for System.AddIn.Contract and System.AddIn.Pipeline namespace to the Interface code file.
  • Implement IContract interface in the contract interface.
  • Add attribute [AddInContract] to the Interface.
  • Define the members of the interface. The members define the communication protocol to use between Add-In and Host.
[Click Image to see in full]


Here I define a rather simple contract , purpose is to show the basic setup for pipeline project.Although project can be scaled according to your requirments.

Next is the Views for Host and the Add-In . Host View :-

  • Add a new class library project to the same solution in visual studio.
  • Add reference of the assembly System.AddIn.Contract.
  • Add an interface code file from Add new project dialog box.
  • Define members for the Interface .Views have same members as the Contract Interface.

[Click Image to see in full]

In host view no attributes are defined . Add-In view assembly and Host view assembly are similar excepty for the attribute applied to them.

Add-In View :-

  • Add a new class library project to a new solution in visual studio.
  • Add reference of the assemblies System.AddIn.Contract and System.AddIn.
  • Add an interface code file from Add new project dialog box.Name the Interface.
  • Add using statement for System.AddIn.Pipeline namespace.
  • Add attribute [AddInBase] to the interface.
  • Define members for the Interface .Views have same members as the Contract Interface.
[Click Image to see in full]


Next is the HostSide Adapter .It will convert the Contract to the Host View :-

  • Add a new class library project to a new solution in visual studio.
  • Add reference of the assemblies System.AddIn.Contract , System.AddIn, Host View assembly and Contract assembly .
  • Add an class code file from Add new project dialog box.Name the adapter class.
  • Add using statement for namespace System.AddIn.Contract,System.AddIn, Host View namespace and Contract namespace.
  • Implement the Host View interface in adapter class.
  • Add attrinute [HostAdapter] to the adapter class.

    [Click Image to see in full]

Add-In side adapter converts the view to contract.
Add-In side Adapter:-

  • Add a new class library project to a new solution in visual studio.
  • Add reference of the assemblies System.AddIn.Contract , System.AddIn, Add-In View assembly and Contract assembly .
  • Add an class code file from Add new project dialog box.Name the adapter class.
  • Add using statement for namespace System.AddIn.Contract,System.AddIn, Add-In View namespace and Contract namespace.
  • Implement the Contract interface in adapter class and inherit the ContractBase class.
  • Add attrinute [AddInAdapter] to the adapter class.

[Click Image to see in full]

Now lets create Add-In :-

  • Add a new class library project to a new solution in visual studio.
  • Add reference of the assemblies System.AddIn.Contract , System.AddIn and Add-In View assembly.
  • Add a class code file from Add new project dialog box.Name the Add-In class.
  • Add using statement for namespace System.AddIn.Contract,System.AddIn, Add-In View namespace .
  • Implement the Add-In view interface in add-in class.
  • Add attrinute [AddIn("EmailAddIn")] to the addin class.

[Click Image to see in full]


Finally our host that probes for the add-in and activates the add-in to consume its services.
Host:-

  • Add a new class library project to a new solution in visual studio.
  • Add reference of the assemblies System.AddIn.Contract , System.AddIn and Host View assembly.
  • Add a class code file from Add new project dialog box.Name the Add-In class.
  • Add using statement for namespace System.AddIn.Hosting, System.AddIn, Host View namespace .

[Click Image to see in full]


Host provides the code for constructing our pipeline for the communication and add-in discovery. We are assuming that our pipeline directory is in the root directory of the solution. Host provide the code for discovery of add-in and the way to activate them

We use the AddInStore class to build our pipeline directory (AddInStore.Rebuild(Path)) . After our add-in pipeline is built we use AddInStore class to find all the add-ins in the pipeline add-in directory (AddInStore.FindAddIns(typeof(IEmailHostView), Path)) . FindAddIns method returns the collection of the AddInToken type which we use to activate any particular add-in .

AddInToken addInToken = addInTokens[0];
this.emailHostView = addInToken.Activate(AddInSecurityLevel.Internet);

Activating the addintoken returns the Host view interface. Now with the host view returned by token activation we can use the service of the add-in. To see all the thing in action we have to build all the assemblies and place them in there respective folders in Pipeline directory. As previously stated that Host and HostView assemblies resides along with all other pipeline folders and are not in there seperate folders. Now if we launch our host and call the add-in discovery and activation method , we can use the add-in service.

Host hst = new Host();

hst.GetEmailAddIn();

hst.ReceiveMessage("Message");

hst.SendMessage();

That's it . We can build Extensible application with Add-In pipeline development and provide our own sdk to the add-in developers to code add-ins for our Host application. In coming blogs I will like to blog about Managed Extensibility Framework as released with .Net 4.0. It's another way to build extensible application using composition containers and dependency injection.